Nov 27, 2006
I finally set the proper tension on the belts and put the belt covers and the one motor mount back on the bike. Time to move onto my next task: the wiring upgrade!
I first read of this wiring upgrade on the Ducati Paso Forum - www.ducatipaso.org and a member there (jcslocum) made a great write-up for adding two relays that improve all sorts of electrical issues, such as hard starting. It has been reported that the stock wiring has the coil voltage go all over the bike, and a huge voltage drop was observed by the time it got to the coils. It's been said that the voltage could drop as low as 9 volts! The first relay allows full voltage from the battery to the coils, and the second relay sends power from the battery to the ignition switch. With all the positive feedback from performing this upgrade, I figured I'd do it, also, since the bike was already apart and it would save me some time and trouble in the future.
To get a feel for what had to be done to the bike, I followed Jon's (jcslocum) instructions, found here....
Jon's Wiring Upgrade pdf File
and I made the modifications to the colored wiring schematic that I had done previously. After making the modifications to the schematic, I had a much better idea why the mods were being performed and how to go about making the mods. Afterwards, through a thread on the paso Forum, I made another schematic that only had the modified circuits and the added relays in color. Here are all three of the wiring schematics. Just click on the thumbnail to see the really large version in color. Let me warn all of you with dial-up that all three of these are around 1.5 MB in size.

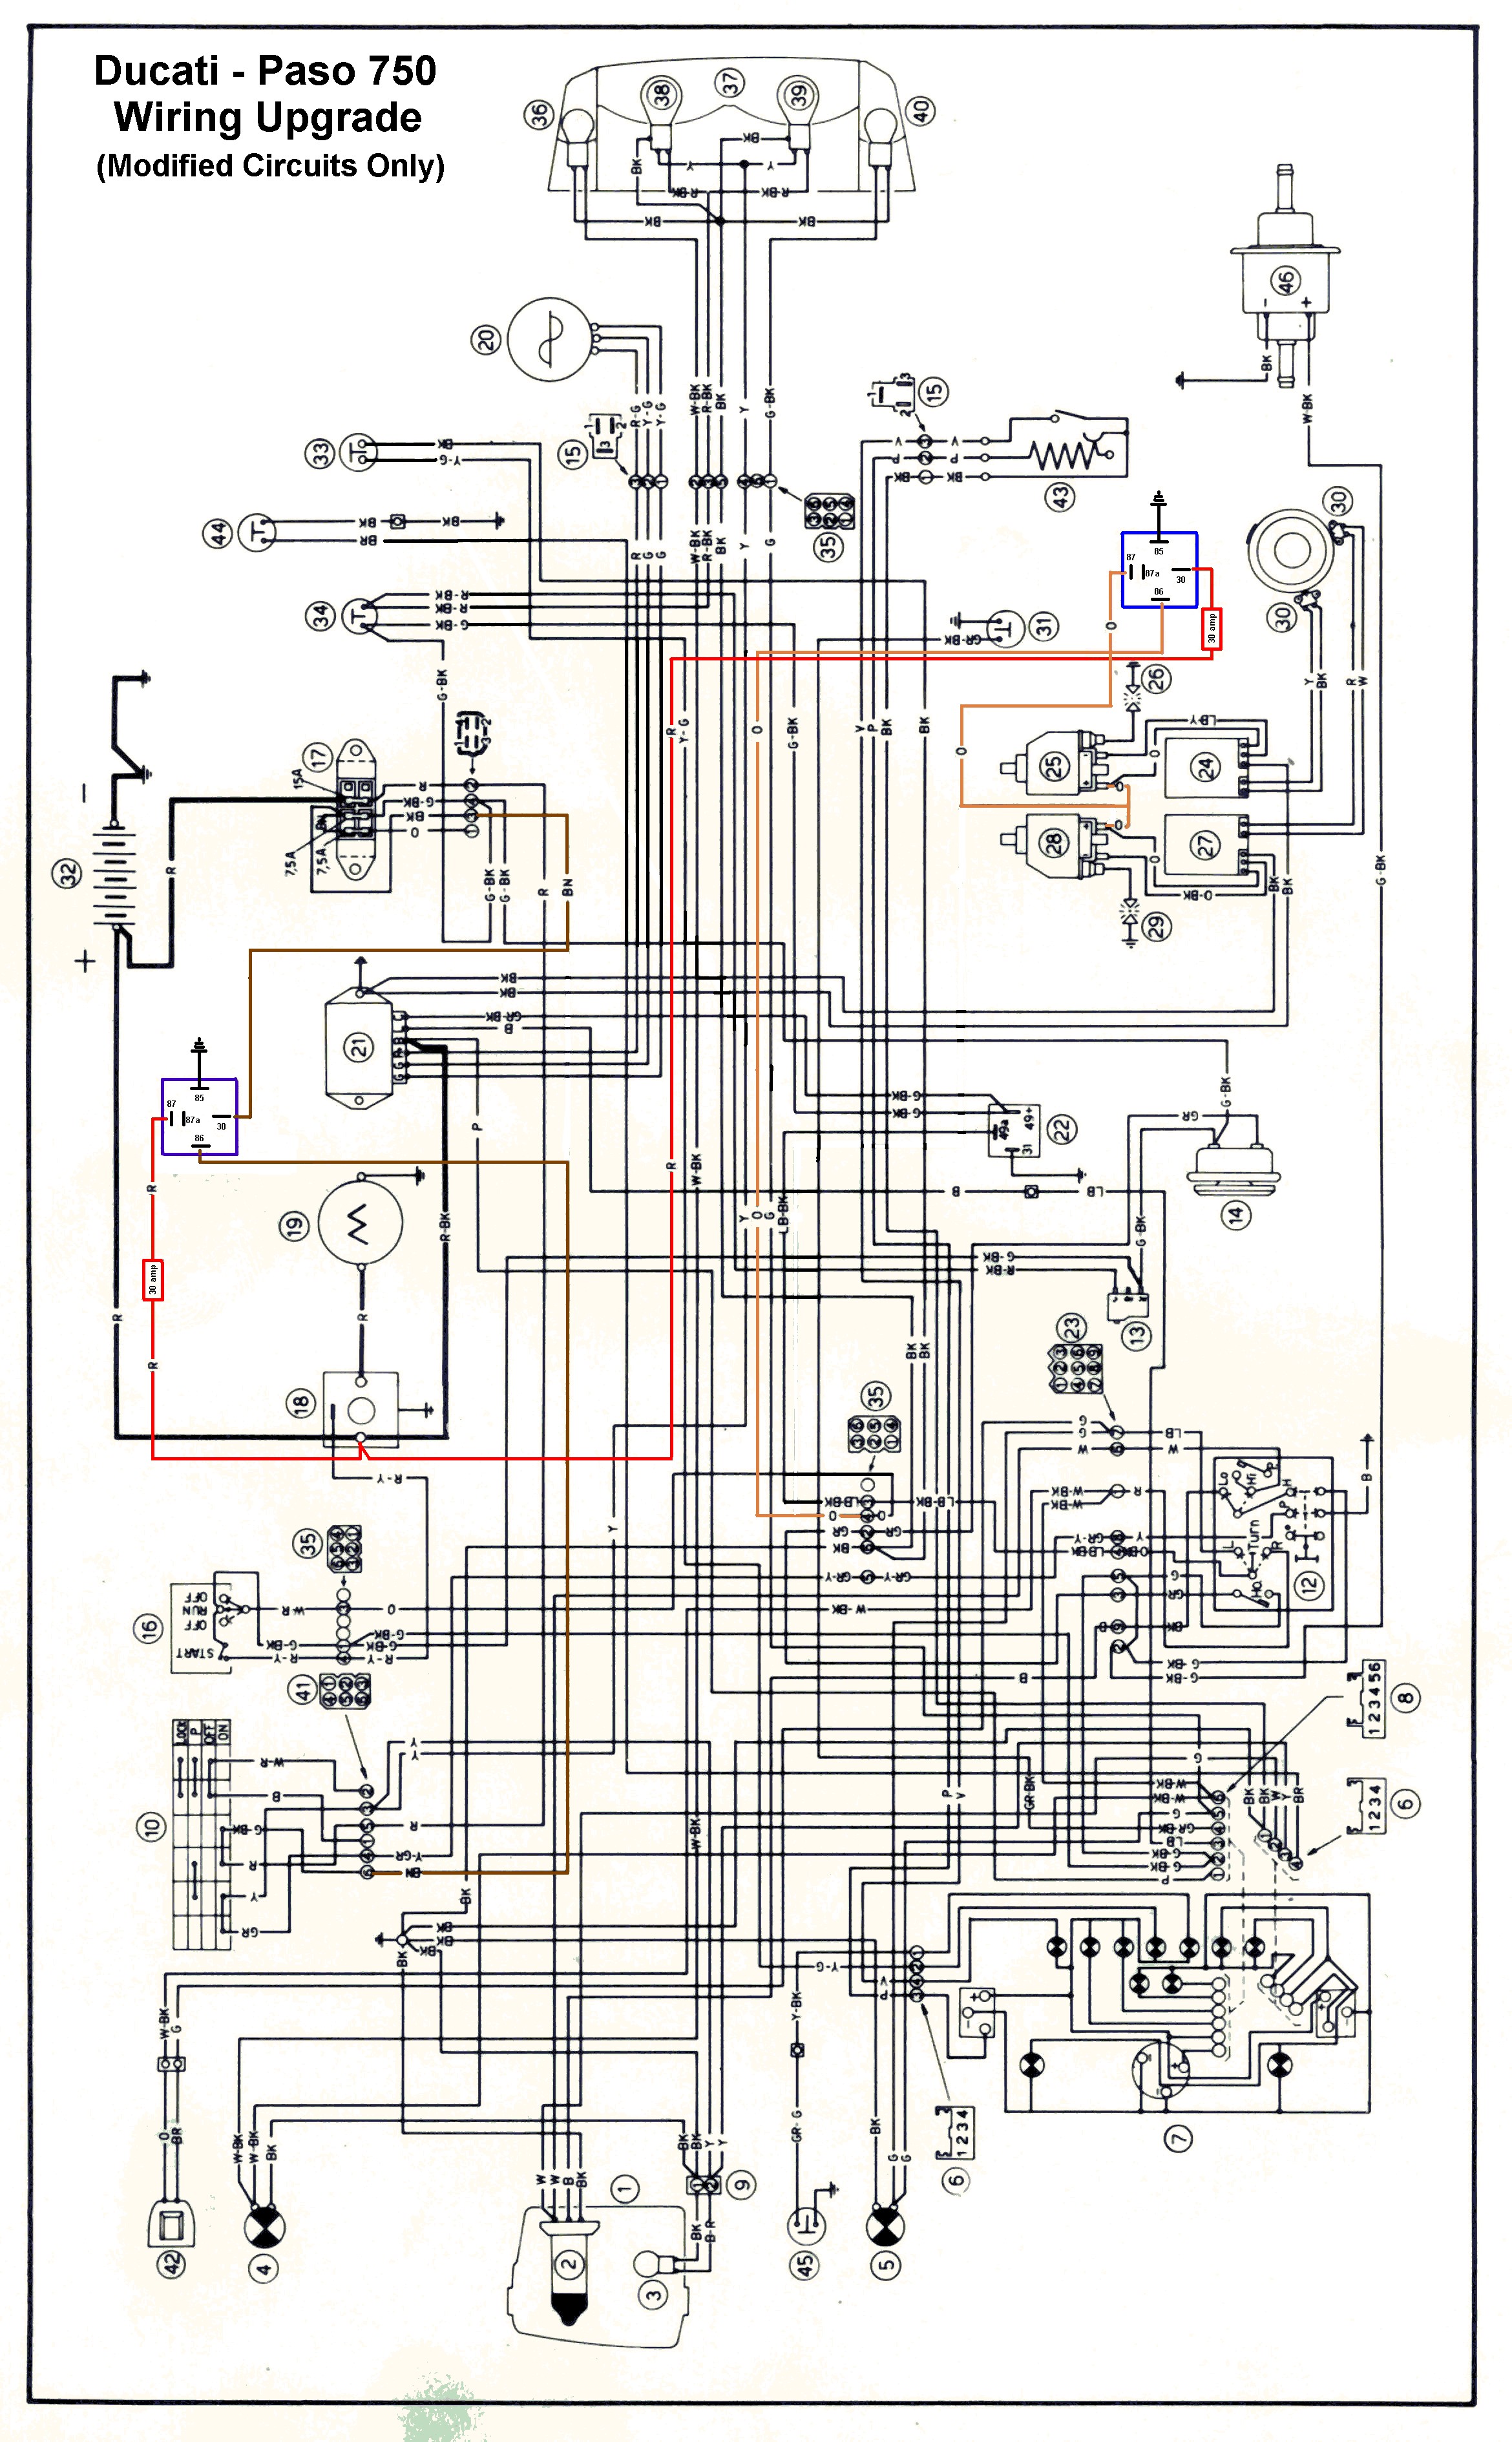
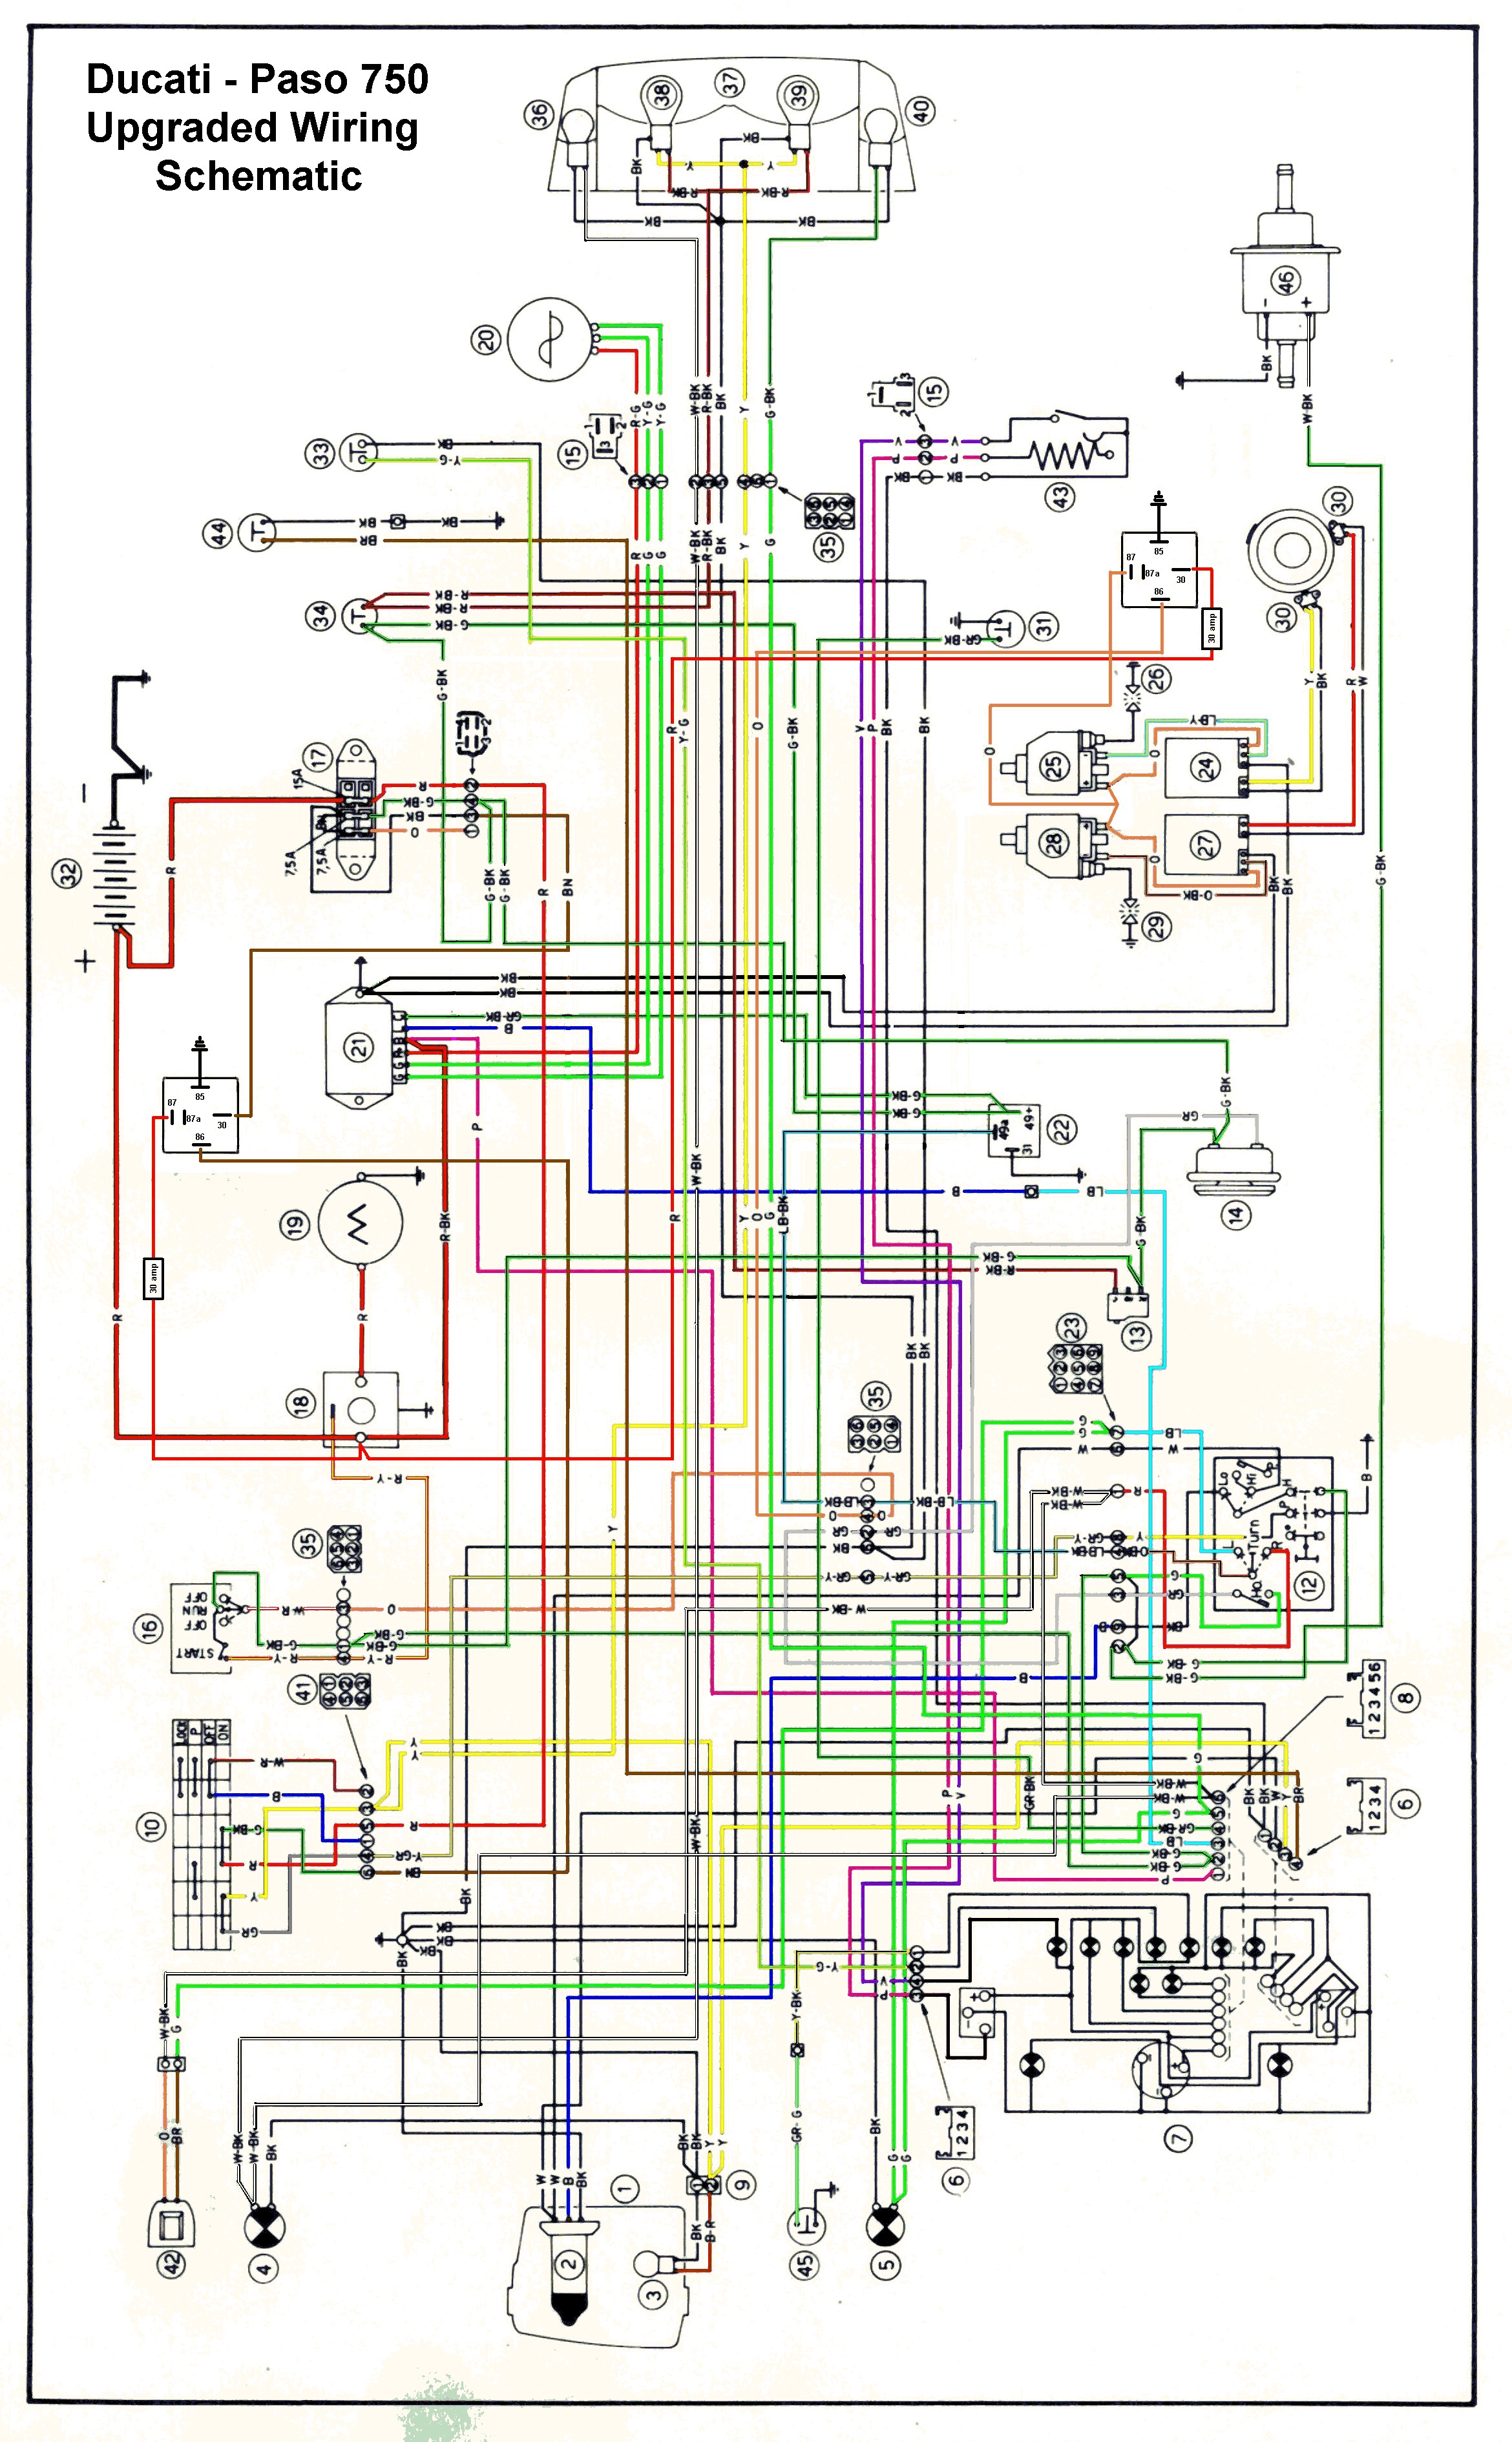
![[Relay added to reduce voltage drop to the ignition switch.]](relay_1.jpg)
![[Relay added to reduce voltage drop to the ignition coils.]](relay_2.jpg)
To read more about the voltage drop and starting issues, and for a better explanation, you can go here: Wiring Issues.
After doing the wiring mod, which didn't take more than an hour and a half with the bodywork removed, I started to run the new fuel line. Also as discussed on the Paso Forum, I am adding an inline, shut-off valve to the fuel line. This is mainly because, with all of the bodywork mounted to the bike, you can't reach the factory's petcock on the bottom of the tank. I picked up a valve from my local ACE Hardware store for $8 and will mount it under the headlight, in an easier-to-reach location. With all the crud that was in the carbs, I'm expecting the float bowl vlave to not seat 100% perfectly, so this is a precaution to any fire hazard. I got about half of the fuel line installed, and got side-tracked with the front end assembly.
![[Additional in-line fuel shut-off valve.]](shut_off_valve.jpg)
I had stopped by a local Ducati dealer and picked up some timing belts for my ST2, and while there, I spoke with the guys about seals and dust boots for the Marzocchi M1R front forks. Knowing that the left leg needs to be disassembled for repair or replacement of the slider due to the broken caliper mounting lug, I wanted to know if these parts were readily available from Ducati before I went to tearing apart the forks. They are, so this was the green light to take the front end apart.
![[The forks pulled off of the Paso.]](no_front.jpg)
![[The forks pulled off of the Paso.]](forks_removed.jpg)
I didn't have any issues with removing the forks from the bike, and they looked to be in good shape, other than the broken caliper mounting lug and the dust boots. I'd hate to imagine how old the fluid is in the forks! Since picking up the bike, a single bolt on the upper triple clamp had me a bit concerned...
![[non-original looking bolt.]](triple_bolt.jpg)
I also have grown to not trust how this bike was reassembled when it was completely disassembled to have the frame powder-coated by the previous owner(s), so I intended to remove the triple clamps to inspect the bearings and torques. Naturally, and not to my surprise, that pinch-bolt definitely was NOT the original bolt! It appears that the original bolt was seized, the head snapped off, and the previous owner(s) decided to drill it out. The hole was drilled off-center, increasing to the size of the original, threaded hole, and then an oversized bolt was forcibly used upon the bike's reassembly! Not surprisingly, the original bolt shank was not removed, so I preceded in pulling that out of the triple clmap. I ended up hitting it with a hammer and punch, cutting it into two pieces via the slit in the triple, mounting it to a vise on my drill press, and slowly takign material off of the original bolt piece with an end-mill. Eventually, I got this wedged piece to collapse into a piece that was easily removed with needle-nose pliers.
![[The way the hole in the triple clamp looked before trying to remove the remains of the original bolt.]](bolt_hole_1.jpg)
![[Second picture of the bolt hole.]](bolt_hole_2.jpg)
![[Third picture of the bolt hole.]](bolt_hole_3.jpg)
![[Two pieces of the original bolt and some metal shavings from the upper triple-clamp.]](triple_mess.jpg)
Looking into the disaster of a pinch-bolt hole, I don't think this can be easily repaired, but I may be able to install a threaded insert or something. I'll have to do some more research on it. Fortunately, this pinch-bolt doesn't appear to be a crucial component to the front fork assembly as the bearing torque is set by a huge nut underneath the upper triple. Unfortunately, I really don't care to deal with trying to salvage thise upper triple and the left slider. A complete, used, stock fork-assembly is more than I'd ever want to spend on this project, so I've been spending a bunch fo time trying to locate these good replacements. If push comes to shove, I may end up doing "Phase 2" a little sooner than I was expecting. "Phase 2" is the installation of forks, triples, 17" wheels, brake calipers, and full-floating iron-rotors from a mid-90s SS900 that were donated to me by a good friend. Until I figure out what I want to do, I guess I'll do the 24k service to my ST2, and I just finished the valve adjustment on it this Thanksgiving weekend.
![[The special nut that is used to hold the steering stem, bearings, and lower to the bike. The upper triple clamp just attaches to this assembly.]](stem_nut.jpg)


Back to Vicki's Paso Homepage.